Unity: How to create a speech balloon
Posted by Dimitri | Dec 13th, 2011 | Filed under Programming

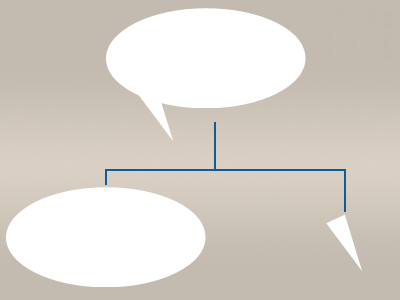
This Unity tutorial explains how to create a speech balloon, like the ones featured on comic books, in Unity3D. For any game, objects move around the screen, and in order to make the speech bubbles work, they have to follow the movement of these objects. However, the balloon can’t be translated in the 3D space, or else it will look like a regular billboard sign over the character’s head. So, it has to follow the character on the two dimensional screen space. The elongated edge of the balloon must also follow the character’s movement, stretching and shrinking accordingly.
To solve these two issues, a script is necessary, which will treat the round part and the triangular tip of the balloon separately.

The script will create a speech balloon by rendering these two parts separately. They must have the same color to create the illusion that it's a single element.
For the round part of the speech bubble, an image rendered as a GUI.Label to represent it. The triangular tip of the bubble is going to be a little more tricky, because it can’t be an image file, because it wouldn’t correctly follow the game object’s movement. Therefore, the script will render it using the Unity’s GL class, manipulating the triangle’s vertices as the character changes it’s position on the screen. By rendering the elements as separated images, it’s possible not only to render text inside the speech bubbles, but any other GUI element as well, such as buttons, images and so on.
Here’s the script that achieves all that:
using UnityEngine;
using System.Collections;

[ExecuteInEditMode]
public class SpeechBubble : MonoBehaviour
{
	//this game object's transform
	private Transform goTransform;
	//the game object's position on the screen, in pixels
	private Vector3 goScreenPos;
	//the game objects position on the screen
	private Vector3 goViewportPos;

	//the width of the speech bubble
	public int bubbleWidth = 200;
	//the height of the speech bubble
	public int bubbleHeight = 100;

	//an offset, to better position the bubble
	public float offsetX = 0;
	public float offsetY = 150;

	//an offset to center the bubble
	private int centerOffsetX;
	private int centerOffsetY;

	//a material to render the triangular part of the speech balloon
	public Material mat;
	//a guiSkin, to render the round part of the speech balloon
	public GUISkin guiSkin;

	//use this for early initialization
	void Awake ()
	{
		//get this game object's transform
		goTransform = this.GetComponent<Transform>();
	}

	//use this for initialization
	void Start()
	{
		//if the material hasn't been found
		if (!mat)
		{
			Debug.LogError("Please assign a material on the Inspector.");
			return;
		}

		//if the guiSkin hasn't been found
		if (!guiSkin)
		{
			Debug.LogError("Please assign a GUI Skin on the Inspector.");
			return;
		}

		//Calculate the X and Y offsets to center the speech balloon exactly on the center of the game object
		centerOffsetX = bubbleWidth/2;
		centerOffsetY = bubbleHeight/2;
	}

	//Called once per frame, after the update
	void LateUpdate()
	{
		//find out the position on the screen of this game object
		goScreenPos = Camera.main.WorldToScreenPoint(goTransform.position);

		//Could have used the following line, instead of lines 70 and 71
		//goViewportPos = Camera.main.WorldToViewportPoint(goTransform.position);
		goViewportPos.x = goScreenPos.x/(float)Screen.width;
		goViewportPos.y = goScreenPos.y/(float)Screen.height;
	}

	//Draw GUIs
	void OnGUI()
	{
		//Begin the GUI group centering the speech bubble at the same position of this game object. After that, apply the offset
		GUI.BeginGroup(new Rect(goScreenPos.x-centerOffsetX-offsetX,Screen.height-goScreenPos.y-centerOffsetY-offsetY,bubbleWidth,bubbleHeight));

			//Render the round part of the bubble
			GUI.Label(new Rect(0,0,200,100),"",guiSkin.customStyles[0]);

			//Render the text
			GUI.Label(new Rect(10,25,190,50),"You can add any GUI element here, like the button below:",guiSkin.label);

			//If the button is pressed, go back to 41 Post
			if(GUI.Button(new Rect(50,60,100,30),"Back to post..."))
			{
				Application.OpenURL("http://www.41post.com/?p=4123");
			}

		GUI.EndGroup();
	}

	//Called after camera has finished rendering the scene
	void OnRenderObject()
	{
		//push current matrix into the matrix stack
		GL.PushMatrix();
		//set material pass
		mat.SetPass(0);
		//load orthogonal projection matrix
		GL.LoadOrtho();
		//a triangle primitive is going to be rendered
		GL.Begin(GL.TRIANGLES);

			//set the color
			GL.Color(Color.white);

			//Define the triangle vetices
			GL.Vertex3(goViewportPos.x, goViewportPos.y+(offsetY/3)/Screen.height, 0.1f);
			GL.Vertex3(goViewportPos.x - (bubbleWidth/3)/(float)Screen.width, goViewportPos.y+offsetY/Screen.height, 0.1f);
			GL.Vertex3(goViewportPos.x - (bubbleWidth/8)/(float)Screen.width, goViewportPos.y+offsetY/Screen.height, 0.1f);

		GL.End();
		//pop the orthogonal matrix from the stack
		GL.PopMatrix();
	}
}
This script has 10 member variables. The first three are the attached game object’s Transform, that will later be used to obtain the game object’s position. The other two are Vector3 variables to store the position of the game object on the screen and at the viewport (lines 8 through 12). Next, there are two integers to store the speech bubble’s width and height (lines 15 and 17). Right below it, there is a pair of floats and a pair of integers. The first pair refers to a positioning offset that can be added to the speech bubble, to better place it on the screen. The second set refers to an offset that aligns the speech balloon on the center of the attached game object, which is calculated later on the code (lines 20 through 25).
The last couple of variables are a Material and a GUISkin. The material is necessary for rendering the round part of the balloon on the screen. The GUISkin, although not vital to make this script work, is useful to defining some of the properties of any GUI element that could be rendered inside the speech bubble, such as text color and the background (lines 28 and 30).
Moving on to the Awake() method, the only thing it does is obtain a handle to the current attached game object Transform component, and store it in goTransform (lines 33 through 37). The Start() method checks if the Material and GUISkin objects have been assigned in the inspector (lines 43 through 54). Not only that, but it also calculates the offset in X and Y coordinates so that the speech balloon is centered into the attached game object (lines 57 and 58).
The next method is the LateUpdate(), where the position (in pixels) of the attached game object on the screen is being calculated (line 65). The normalized, viewport coordinates (from 0.0 to 1.0) are also being calculated (lines 69 and 70).
The following lines of code at this method require a more detailed explanation. Only the screen position of the game object on the screen, in pixels is being calculated by calling the WorldToScreenPoint() method (line 65). The normalized viewport coordinates are obtained by dividing the result by the screen width and height (lines 69 and 70). The normalized Z value of the game object on the screen doesn’t matter, for this particular case. These lines could easily be replaced by commented code at line 68, however, by doing so, we would be only repeating the same 3D space to 2D screen space operation just to obtain the normalized coordinates. This has already been done on line 65.
The OnGUI() method is where the round part of the speech balloon is rendered and all the elements that goes inside it. First, a GUI group is created (line 77). The group location is centralized at the position of the attached game object on the screen with the added offsets. The width and height are the ones defined at the offsetX and offsetY variables. Inside this group the round part of the speech balloon is rendered as a label (line 80). Also, a text and a button were added to the balloon (lines 83 through 89).
Lastly, the OnRendreObject() is being defined. This method is called after all objects on the scene are rendered. In terms of rendering order, for this case, it works the same as OnPostRender() except it doesn’t have to be attached at game object with camera component to work. This is great, since all the code necessary for the speech bubble can be placed at the same script. At this method, some GL class methods are being called, to render the balloon’s triangle at the correct location. It’s quite similar to fixed function pipeline OpenGL, the only noticeable difference are lines 100 and 102 that, respectively, set the current material to be used for the subsequent rendering operations and load an orthogonal projection matrix.
At lines 104 through 114, the triangle vertices are being assigned. The first vertex to be defined is the one that is at the bottom of the triangle. It’s placed at the same X coordinate as the game object on the screen, but the Y position is three times smaller than the position of the game object (line 110). Line 111 and 112 works similarly as line 110, however the same logic is applied to the X axis, by dividing the offset of these two vertexes, placing the triangle a little bit to the left. This makes the triangle look more like the ones we see on the speech bubbles in comic books, since they are generally placed above the character or object that is emitting a sound and are slightly angled.
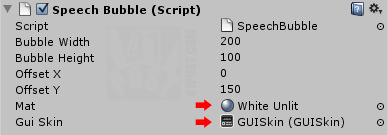
The last thing to do is to attach the script to a game object and assign a material and a GUI Skin to the script:

Add a material and a GUI Skin to the script. For better results, select a Unlit Texture material.
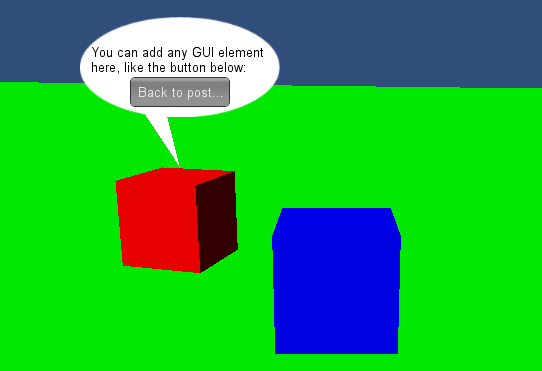
That’s it! Here’s how it looks like:

Unity: Speech Balloon example project screenshot
There are some limitations to this script. Basically, the round part of the bubble can’t be placed under the triangular tip. Since this script isn’t rotating the tip, it will disappear if the round part of the bubble is placed on the bottom. This script was designed to display the balloon on top of the game object, anything different than that will cause rendering problems, specially at the triangular part.


great! 3q for sharing ~~
nice. article , I am continuously reading your unity 3d articles. all are very interesting and good. Could you please write an article on the sprite movement without using Sprite Manager.
Thanks
Thanks a lot!
I have never used Unity3D for 2D games, so I wouldn’t know where to begin. Have you created a 2D game using Unity3D? Is it also good for 2D games?
Yes, Unity 3d is also best for 2d games, Basically i like your way of Explanation and
write style, so you should to write about the 2d sprite movement.it will help us.
Following are the some of the tutorials about the 2d sprite movement.
http://www.unifycommunity.com/wiki/index.php?title=Animating_Tiled_texture
http://www.rebelplanetcreations.com/downloads/Other/Tutorials/HowToMakeAGameInUnity3D.pdf
Thanks
I love you. Perfect, exactly what I needed.
My Gosh! Awesome! =D Very nice dude! Thank you for sharing!!!
Works like a charm. Exactly what I was looking for!
Thanks for working on this and sharing!
Hey, I just came by your script and I really like it! I have a question, though: Isn’t it possible to resize the round part of the bubble, so also long texts fit inside? I tried using a bigger width at the Rect() used for the label but it didn’t work. Any ideas?
Thanks!
Thanks! I think that maybe you could do that by using the GUISkin border property. However, you’ll need to modify the texture, so it can work correctly with the values assigned to the border property.
In short, you will need to divide the bubble into each of its four corners and join them into a single image. Then, you set the border property according to your image. This article on Unity’s website might help: http://docs.unity3d.com/Manual/class-GuiTexture.html .