Android: Initialize View child class object from a XML file
Posted by Dimitri | Nov 16th, 2011 | Filed under Programming
This tutorial shows how to inherit from the View class to create your own customized View element, and how to initialize an object from this child class with parameters defined at a layout XML file. There are two major advantages in this approach over initializing the extended View object at the Activity.
The first is that the Java part of your code remains clean, without a lot of member variable assignments to set the View’s basic parameters. The second and most important, is the possibility to instantly preview the changes at the Graphical Layout tool in Eclipse without the need to execute the application. This means that the space this customized View element takes on the screen can be immediately be seen and adjusted, if necessary.
An example Eclipse project is available at the end of the post. This has been tested both on an emulator and a real device both running Android 2.0.
So, let’s start by creating a class that inherits from the View class, like this one:
package fortyonepost.com.cvxml;

import android.content.Context;
import android.graphics.Canvas;
import android.graphics.Color;
import android.graphics.Paint;
import android.util.AttributeSet;
import android.view.View;

public class CustomView extends View
{
	//variables to hold the custom attribute values
	private String redText;
	private int value;

	//a paint object to render the redText
	private Paint paint;

	public CustomView(Context context, AttributeSet attrs)
	{
		super(context, attrs);

		//initialize the paint object
		paint = new Paint();
		//set the color to red
		paint.setColor(Color.RED);

		//initialize the redText String with the attribute with the same name at the XML file
		redText = attrs.getAttributeValue(null, "redText");
		//initialize the value integer with the attribute with the same name at the XML file
		value = attrs.getAttributeIntValue(null, "value", 0);
	}

	@Override
	protected void onDraw(Canvas canvas)
	{
		super.onDraw(canvas);

		//render the redText at the specified position
		canvas.drawText(redText, 10, 100, paint);

		//render the integer variable value
		canvas.drawText("Value: " + Integer.toString(value), 10, 140, paint);
	}

}
This simple View child has three member variables: a String and an integer that will later be used to hold the custom values defined at the XML layout file. And also, the Paint object is being initialized. This object is responsible for setting the render settings in the Canvas. For this example, it will set the text to red (lines 13 through 17).
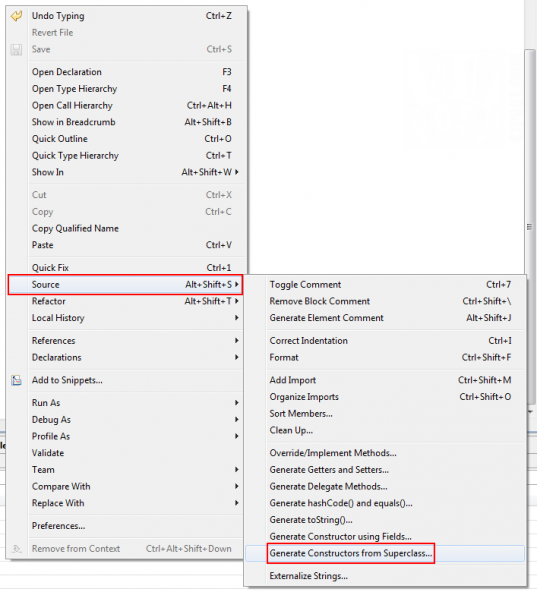
Next, there’s the CustomView constructor, which is inherited from the View class and is the is the most critical part of this code (lines 19 through 32). It’s necessary to implement one of the View constructors that takes an AttributeSet object as a parameter, otherwise it won’t be possible to inflate the CustomView from a XML file. In Eclipse, it’s a very easy task to accomplish, just right click anywhere inside the class and select Source->Generate Constructors from Superclass. A list of constructors from the View class to be implement will be shown; select the one that takes the Content and the AttributeSet objects as parameters.

In the next dialog, select one of the constructors that takes the AttributeSet object as a parameter.
The constructor also initializes the Paint object, sets its color to red, obtains custom fields from the layout XML file and stores then into the redText and value variables (lines 24 through 31). This custom fields are just attributes that can be added to the XML file and they hold just about any type of data we want. However, it’s wise to use only boolean, integer, float or string values as attributes, since methods to obtain these types of data from the layout XML are already available at objects from the AttributeSet class. In the above example, just take a look at lines 29 and 31, where, respectively a string and an integer are being obtained from the XML file and stored into member variables.
There’s no reason to define an extended View class if it doesn’t display anything, so that’s the reason why this code also overrides the onDraw() method, which is responsible for the rendering. In this example, the string and the integer obtained from the custom XML attributes are being rendered on the screen using the Paint object.
That’s about it for the View class child. As for the XML, all that’s required is to define the CustomView parameters, like this:
<?xml version="1.0" encoding="utf-8"?>
<?xml version="1.0" encoding="utf-8"?>
<LinearLayout xmlns:android="http://schemas.android.com/apk/res/android"
    android:layout_width="fill_parent"
    android:layout_height="fill_parent"
    android:orientation="vertical" >

        <fortyonepost.com.cvxml.CustomView
        android:id="@+id/gv_gameView"
        android:layout_width="fill_parent"
        android:layout_height="fill_parent"
        android:background="#0000FF"
        redText = "This is a test text."
        value = "3"
        />
</LinearLayout>
The only thing one needs to watch out for is not to forget to include the namespace and the package name and not just the class name. The custom XML attributes are being defined at lines 13 and 14.
Finally, an object of the CustomView class must be created at an Activity. It must also inflate the CustomView with the parameters defined at the XML file, like this:
package fortyonepost.com.cvxml;

import android.app.Activity;
import android.os.Bundle;

public class CustomViewXMLActivity extends Activity
{
    /** Called when the activity is first created. */
    @Override
    public void onCreate(Bundle savedInstanceState)
    {
        super.onCreate(savedInstanceState);
        setContentView(R.layout.main);
    }
}
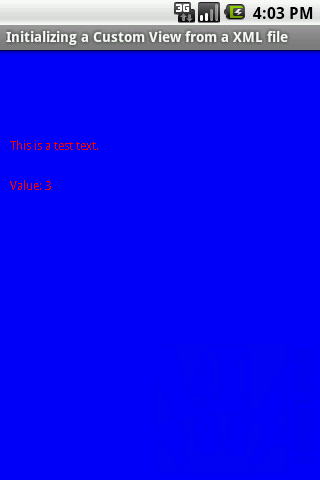
And that’s all there is to it. When executed, the above example application outputs the following:

Example project screenshot.
Downloads
Be the first to leave a comment!


