Unity3D: Using textures larger than 4096×4096
Posted by Dimitri | Oct 30th, 2011 | Filed under Featured, Programming

This post explains how to assign images larger than 4096×4096 px as textures in Unity. This image size is the maximum supported dimension for a texture in that game engine, however Unity allows us to write our own custom shaders that can use four images as textures, instead of just one.
Therefore, this post shows how to create a simple diffuse shader that takes four images to compose a single texture. That way, a 8192×8192 image can be used as a texture by breaking it into four 4096×4096 pieces, thus respecting the engine’s image size limit.
So, the first step is to divide the 8192×8192 image equally into four pieces and and save them as separate images. That can be achieved with any image editing software like Photoshop or GIMP. As an example:
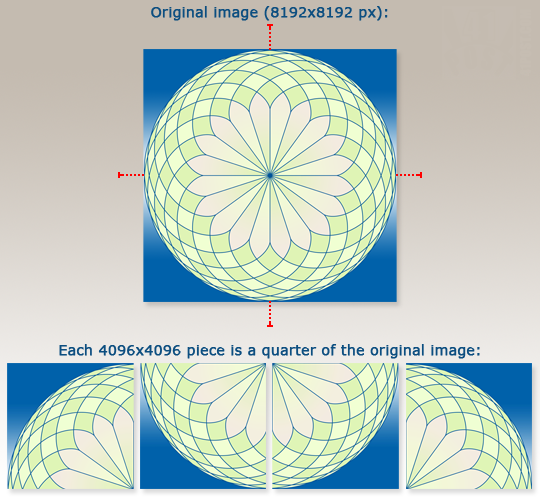
The red marks show where the image has been divided. This is the image that is going to be used as the texture example throughout the rest of this post.
After dividing the image into four pieces, the second step is to create a new shader in Unity. Creating a new shader file is just like creating an other script: right click anywhere inside the Project Tab and select Create->Shader. This will create a new shader file. As a default, the recently created shader will already contain the code for a simple diffuse shader that takes one texture as the input. Now, all it’s left to do is to add more inputs to the shader, transform the texture coordinates and add the resulting color information of the four images into the output. This is how the four part texture shader looks like:
Shader "Custom/4-Part Texture" {
	Properties {
		_MainTex0 ("Base (RGB)", 2D) = "white" {}
		//Added three more textures slots, one for each image
		_MainTex1 ("Base (RGB)", 2D) = "white" {}
		_MainTex2 ("Base (RGB)", 2D) = "white" {}
		_MainTex3 ("Base (RGB)", 2D) = "white" {}
	}
	SubShader {
		Tags { "RenderType"="Opaque" }
		LOD 200

		CGPROGRAM
		#pragma surface surf Lambert

		sampler2D _MainTex0;
		//Added three more 2D samplers, one for each additional texture
		sampler2D _MainTex1;
		sampler2D _MainTex2;
		sampler2D _MainTex3;

		struct Input {
			float2 uv_MainTex0;
		};

		//this variable stores the current texture coordinates multiplied by 2
		float2 dbl_uv_MainTex0;

		void surf (Input IN, inout SurfaceOutput o) {

			//multiply the current vertex texture coordinate by two
			dbl_uv_MainTex0 = IN.uv_MainTex0*2;

			//add an offset to the texture coordinates for each of the input textures
			half4 c0 = tex2D (_MainTex0, dbl_uv_MainTex0 - float2(0.0, 1.0));
			half4 c1 = tex2D (_MainTex1, dbl_uv_MainTex0 - float2(1.0, 1.0));
			half4 c2 = tex2D (_MainTex2, dbl_uv_MainTex0);
			half4 c3 = tex2D (_MainTex3, dbl_uv_MainTex0 - float2(1.0, 0.0));

			//this if statement assures that the input textures won't overlap
			if(IN.uv_MainTex0.x >= 0.5)
			{
				if(IN.uv_MainTex0.y <= 0.5)
				{
					c0.rgb = c1.rgb = c2.rgb = 0;
				}
				else
				{
					c0.rgb = c2.rgb = c3.rgb = 0;
				}
			}
			else
			{
				if(IN.uv_MainTex0.y <= 0.5)
				{
					c0.rgb = c1.rgb = c3.rgb = 0;
				}
				else
				{
					c1.rgb = c2.rgb = c3.rgb = 0;
				}
			}

			//sum the colors and the alpha, passing them to the Output Surface 'o'
			o.Albedo = c0.rgb + c1.rgb + c2.rgb + c3.rgb;
			o.Alpha = c0.a + c1.a + c2.a + c3.a ;
		}
		ENDCG
	}
	FallBack "Diffuse"
}
There isn’t much code that was added to the default diffuse shader. The first noticeable difference are the three additional image slots to the Propreties struct, that way we can pass the images to the shader using Unity’s graphical interface (lines 5, 6 and 7). Then, there are three sampler2D variables being declared at the SubShader struct. They tell the shader that we are using the images assigned at the slots as inputs, and that’s why both the slots and the 2D samplers share the same name (lines 18, 19 and 20).
Finally a float2 variable is being declared. As you might have guessed, it stores a two dimension vector of float values. It will be used to calculate the current texture coordinates multiplied by two. By doing that, all textures will occupy the maximum size of one quarter of the 3D model (line 27). Then, inside the shader’s surf function, the vector coordinates are doubled and stored inside the dbl_uv_MainTex0.
Next, all images are converted into 2D textures using the sampler2D variables and the doubled texture coordinates as inputs to the tex2D() function. Note that some textures coordinates are also being subtracted by a float2 offset, because doubling the texture coordinates makes all the different images to be rendered as textures on top of each other, at the bottom left corner of the 3D model. And that’s what these offsets do: reposition the images in a way they create one single image. The color data returned by the tex2D() function calls are being stored at the c0, c1, c2 and c3 variables (lines 35 through 38).
The most noticeable difference from this shader to the code of the default diffuse one is the if statement block that starts at line 41 and ends at line 62. It basically guarantees that the four textures are not going to overlap when they are being wrapped or repeated on the 3D geometry. Every time it does, the color is set to 0, which is equal to black. Here’s an image of a 3D plane with this shader applied, without this if statement:
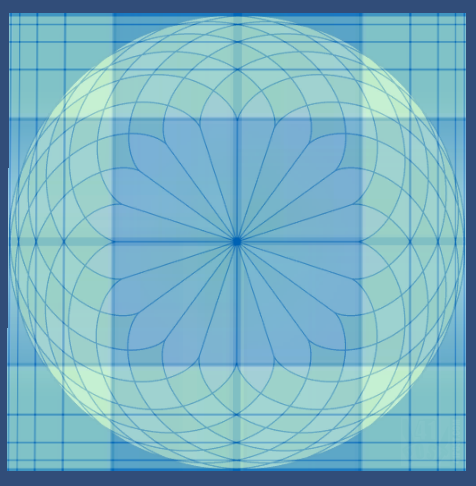
By removing the if statement, the images would wrap over themselves. This is what a plane that uses this shader would look like, without this if statement.
The last thing this shader does is add all color values from the c0, c1, c2 and c3 variables to the output surface. The same is done to all alpha values (lines 65 and 66).
The third step is to import the four images, by dragging and dropping them into Unity. Don’t forget to set the Wrap Mode to Clamp, and Max Size to 4096 to each image, at the Texture Importer, as shown:
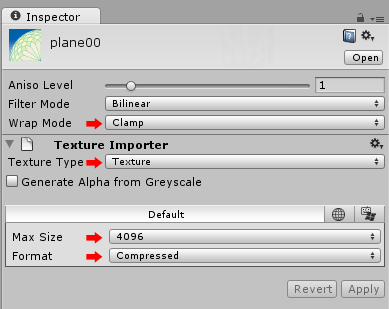
These are the importer settings that needs to be applied to each image quarter, so they can compose a single 8192x8192 image. Don't forget to hit the 'Apply' button for those settings to take effect.
Finally, to use the shader, create a new Material by, again, right clicking into the Project Tab and selecting: Create->Material. After that, select the shader from the drop down menu (it’s inside the Custom item) and assign the images to the texture slots, like this:
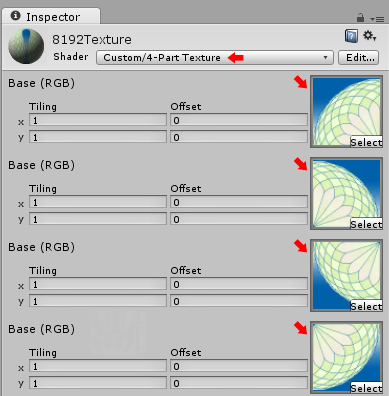
Each image quarter, assigned to a texture slot. The first two slots are the top left and top right parts of the image. The remaining pair corresponds to the bottom left and bottom right parts. Don't forget to select the '4-Part Texture' shader from the 'Shader' drop down menu.
Now, the material is ready to be used. Just assign it to any object into the scene and it will use the shader we have just created. Here’s a screenshot of the example project:
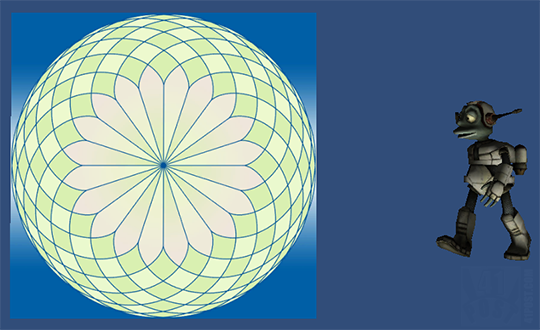
A screenshot from the example project. To the left a plane that uses the 8192x8192 texture, composed by the four different textures. To the right, the Lerpz model was added to show this shader works even with 3D objects that were unwrapped and assigned custom textures coordinates.
Of course, the original texture from Lerpz had a size of 1024×1024, and it was divided into four 512×512 images. Not only that, but the shader it used has been replaced by the shader created in this tutorial.
A 4096×4096 is actually a huge texture size for a game. So the reader might consider if using a texture larger then the one supported by Unity is really the only way to go. For example, at the sample project, there is almost no difference using a single 1024×1024 texture instead of using an image eight times that size.
Here’s the example project:
Downloads
- TexturesLargerThan4096.zip (14 MB)


Nice post man, slick piece of code!..
Thanks!
I wonder why you didn’t optimise the code like the following…
Shader “Custom/Four-part-mod” {
Properties {
_MainTex0 (“Base (RGB)”, 2D) = “white” {}
_MainTex1 (“Base (RGB)”, 2D) = “white” {}
_MainTex2 (“Base (RGB)”, 2D) = “white” {}
_MainTex3 (“Base (RGB)”, 2D) = “white” {}
}
SubShader {
Tags { “RenderType”=”Opaque” }
LOD 200
CGPROGRAM
#pragma surface surf Lambert
sampler2D _MainTex0;
sampler2D _MainTex1;
sampler2D _MainTex2;
sampler2D _MainTex3;
struct Input {
float2 uv_MainTex0;
};
float2 dbl_uv_MainTex0;
void surf (Input IN, inout SurfaceOutput o) {
dbl_uv_MainTex0 = IN.uv_MainTex0*2;
half4 c;
if(IN.uv_MainTex0.x >= 0.5)
{
if(IN.uv_MainTex0.y <= 0.5)
{
c = tex2D (_MainTex3, dbl_uv_MainTex0 – float2(1.0, 0.0));
}
else
{
c = tex2D (_MainTex1, dbl_uv_MainTex0 – float2(1.0, 1.0));
}
}
else
{
if(IN.uv_MainTex0.y <= 0.5)
{
c = tex2D (_MainTex2, dbl_uv_MainTex0);
}
else
{
c = tex2D (_MainTex0, dbl_uv_MainTex0 – float2(0.0, 1.0));
}
}
o.Albedo = c.rgb;
o.Alpha = c.a ;
}
ENDCG
}
FallBack "Diffuse"
}
Hey this was very helpful! Have you also created a version with normal map support?
Thank you. No I didn’t.