Unity: Scaling Pixel Art
Posted by Dimitri | Sep 5th, 2011 | Filed under Programming
This Unity post explains how to prepare images and set the Texture Importer settings to correctly render pixel art in Unity3D. So, this post covers how the different Texture Importer settings affects the pixel art textures in 3D models and in the game’s graphical user interface (GUI).
Before importing the images into the aforementioned game engine, they have to be correctly prepared at an image editing software, like Photoshop or GIMP. While at it, the pixel art image must be exported as a square with its sides having a size equal to any number that is a power of two. By doing this, we will be making sure that the Texture Importer in Unity doesn’t change the image’s pixel information in any way, since images which are not power of two are resized in the engine to meet this criteria. So, by following those two simple rules, the reader can rest assured that the image will be rendered as intended.
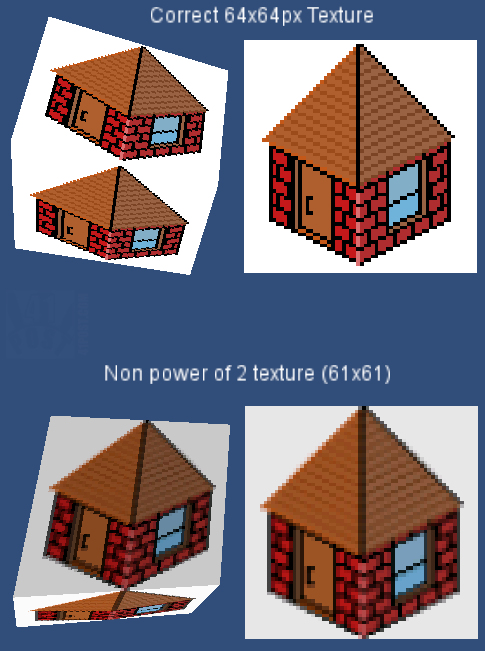
To exemplify, here’s an image that shows the difference between a properly scaled pixel art image and one that isn’t:

Comparison between a square image and a square, power of two image.
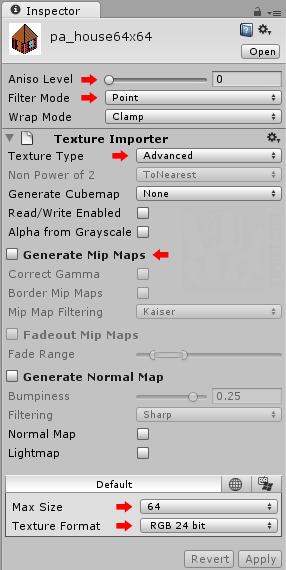
As for the Texture Importer settings, here are the parameters that renders the pixel art correctly:

Texture Importer settings for pixel art rendering.
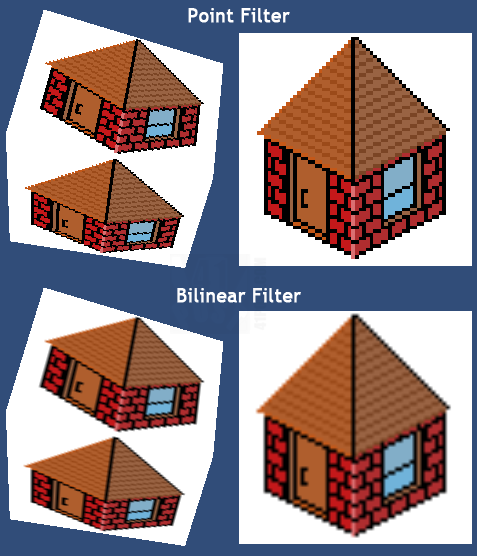
It doesn’t matter if the pixel art image is going to be used as a texture at a 3D model or as a GUI element, these settings will be exactly the same for both. Right now, let’s focus on how these settings affect the textures in 3D models. The Aniso Level is set to zero because, when rendering pixel art, there is no difference between setting it as 0 or 9. The Filter Mode is set to Point. This filter mode preserves pixels on the image if it’s rescaled. Setting it to Trilinear or Bilinear will just blend the pixels, defeating the purpose of the pixel art. Here’s an image that illustrates this difference:

The bilinear filter makes the pixel art appear to be blurred.
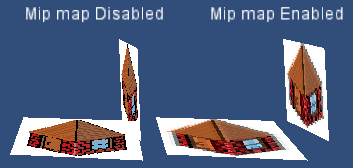
The Texture Type is set to Advanced to have more control over the texture that’s being imported. Since this is a simple texture, there’s no need for a Cubemap, and its check box is set to false. Likewise, the Read/Write Enabled and Alpha from Grayscale flags are also set to false. Now, the Generate Mip Maps flag is one of the most important flags to leave unchecked. This setting only affects 3D objects, since mip maps are smaller textures generated from the original image that are used if the 3D object is distant from the camera. By leaving it enabled, the pixels are going to be blended if the object is away from the viewing point. Not only that but, if the object’s texture is being rendered with a mip map and the camera is at a steep angle, the pixel art will appear to be even more distorted. Here’s an image that illustrates the difference between leaving the mip map generation enabled or disabled:

By enabling the mip map generation, the pixel art will look blurred when the 3D object is distant from the camera. The distortion will be even worse when the mip map is being used and angle between the camera and the 3D object is too steep.
Finally, there is the Max Size and the Texture Format Settings. The former refers to the maximum size an imported texture can have in Unity. Since the image file used in this tutorial is 64×64, we just select 64 from the drop down menu. The latter (Texture Format) defines how the image gets decoded by the engine. In this case, it’s set to RGB 24 bit, because the transparency information at the Alpha channel was not needed (for this example).
If that’s not your case, you must set it as RGBA 32 bit. Pixel art images tend not to have a lot of different shades of the same color, meaning that, in some cases the RGB 16 bit or the RGBA 16 bit formats could be used, however, they might alter the color of the image. It heavily depends on the number of colors used to create the pixel art image, this way, it’s up to the reader to test the 16 bit color formats.
Don’t use the DXT1 or the DXT5 compressed formats: they will cause the pixels to get blended together.
That’s it for pixel art as textures for 3D models. Now, when using pixel art for GUI elements, just make sure that they are being rendered at the screen with a power of two size. It’s also worth mentioning that scaling the image half it’s size will not make it look as good as scaling it twice the size. Surprisingly, rendering the image at a random square resolution also works, although it doesn’t look as sharp as rendering it with the height and width equal to a power of two. Here’s an image that exemplifies those differences:

Remember that the image is originally 64x64 px. By rendering it using an arbitrary size, the pixel art is almost destroyed (image at the bottom). Also, rendering the image file at half its size doesn't yield in a good result.
That’s it! You might have noticed that this post doesn’t mention or explains how to rotate pixel art images in Unity and some issues that might arise while doing so. To address some of the pixel art rotation problems, please refer to this thread on Unity Answers website.
An example Unity3D project with everything explained here is available at the link below:
Do you have any more tips to handle pixel art in Unity? Please share it in the comments.


Hey there, just wanted to help out : anisotropic filtering is the setting that smooths the texture when viewed at steep angles not mip mapping. Mip maps are lower resolution textures generated and stored alongside the original that are replaced when the texture is viewed from long distances where the full resolution texture would create artefacts.
Thanks for the feedback! I know that. The way this post was written may be leading to a wrong interpretation. Altered the text on that paragraph, just in case.
What I was trying to say is that, if you lay a giant 3D plane as the ground of your level and place the camera at a steep angle, the distance between the camera and the plane would use a mip map, thus “blurring” the pixel art at some point of the plane (because of the distance between the camera and the plane).
The steep angle would only help to make the pixel art image appear to be even more distorted.
But don’t mip maps exist to improve performance? Is it a good idea to disable them even your game is going on say, a mobile device?
We were fighting with some of these exact issues on our project. Thanks for this awesome post!
Thanks!
Great post this is helping with a Zelda type game we are doing, however I’m running into some issues with using point filtering for pixel art where I’m getting about a one pixel jitter on my objects in the scene when I move the camera, if I switch to biliniar it’s way less intense. Given you have some understanding as to how to work with pixel art I’m curious if you had any thoughts on what might help with this?
I don’t know how to completely solve that. Maybe you can try to change the projection size, if you are using a camera with an orthographic perspective or switch to another texture format at the texture import settings.
Ok, i’ll try a few more things, figured I’d ask, it might be ex2D causing this, not sure. Thanks anyways!
Great article! Thank you for taking the time to write it! :)
Like Justin, I have a question about the pixel jitter. As the ex2D guys explained to me, the Point filter should only be used for static textures. If you move the texture or its associated camera, you start to see the pixels jitter because there’s no in between smoothing on the pixels. Using the Bilinear filter fixes the jitter because it smoothes out all of the pixels. Of course, as shown above, that makes the textures appear blurry.
So I’m not sure what to do :-/ Is there a way around this problem? :-/
Ahh! I found the solution I was looking for: http://www.third-helix.com/?p=2199. I wasn’t giving enough thought to the size of my orthographic camera :)
Sorry for taking so long to reply. Thanks for sharing the solution to this problem.
เว็บไซต์.
Here is my webpage; wikithai