Unity: How to create a GUI Sprite Sheet – Part 2
Posted by Dimitri | Apr 10th, 2011 | Filed under Programming

This is the second part of a series that will explain how to create a GUI sprite sheet for Unity. For this part, we will take the images created in the first post and import them to Unity. Also, this post features how to correctly set the images to be part of a GUI Skin object so they can be used as part of a game’s interface.
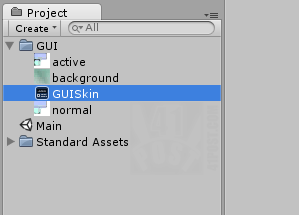
After having all images correctly placed at the sprite sheet, create a new GUI Skin by right-clicking anywhere inside the Project tab and select the following: Create->GUI Skin. Then, import the images in Unity, by dragging and dropping them inside this tab. It’s a good idea to put everything GUI related at the same folder, like this:

The GUI Skin and the images - all in the same folder.
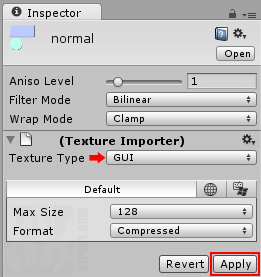
The second step is to select the images and set the Texture Type as GUI at the Inspector tab:

Select 'GUI' as the 'Texture Type' and hit 'Apply'.
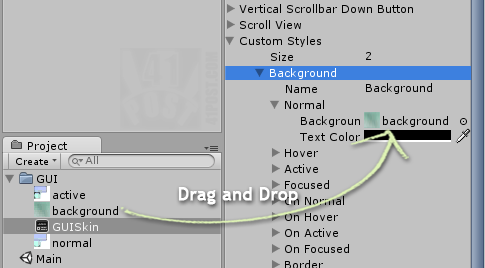
Repeat that for the other images as well. The third part of the process is to open the previously created GUI Skin and select the Custom Styles list at the inspector. Since we have 3 images, and two of then are sprite sheets with different states, set the Size to 2. Select the first element on the list and name it ‘Background‘ (or any other name). Collapse the Normal state, and drag and drop the background.png file into the Background slot:

Drag and drop the 'background.png' file into the 'Background' slot.
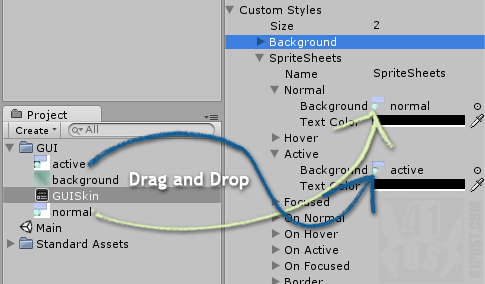
Still on the GUI Skin inspector, open the second Custom Style slot in the list. Give it a name (e.g.: ‘Sprite Sheets‘), and collapse the Normal state. This is a crucial part of this whole process: drag and drop the normal.png file into the Background slot of the Normal state. Now expand the Active state, and set the active.png as its Background, like this:

Drag and drop each sprite sheet into their corresponding state 'Background' slot.
Every image is now imported and configured in Unity. It’s just a matter of placing the script file and we will have the GUI. But that’s something for the next post of the series, available here: Part 3 – The code.


Very nice tutorial. Helped me a lot! Thank you!