Unity: Normal Walker
Posted by Dimitri | Jun 22nd, 2011 | Filed under Featured, Programming

This Unity programming tutorial explains how to create a controllable character that appears to ‘walk’ on the surface of another object. That’s achieved by using a script that matches the normal up orientation vector of the controllable game object with the surface normal of the other 3D object. But not only the script, this post also explains how to set up a scene to make it work.
A demo project with everything discussed here is available at the end of the post both in C# and JavaScript.
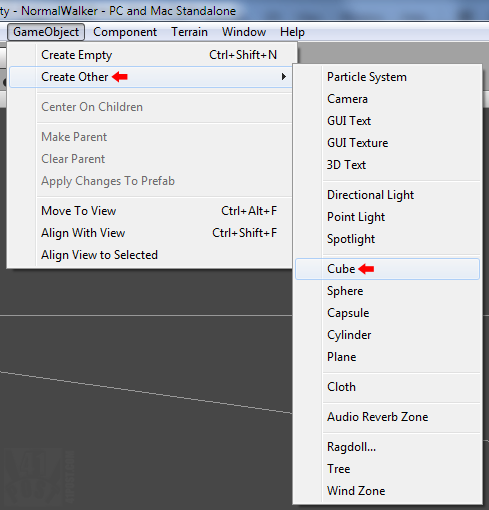
The first step is to create a Cube game object, that will act as your player. To do it, just select GameObject->Create Other->New Cube:

Creating a new Cube game object.
Repeat this step, but this time, select Sphere, instead of Cube to create a sphere, so the player will have a object to ‘walk’ on. Scale this sphere to a much bigger size than the cube’s.
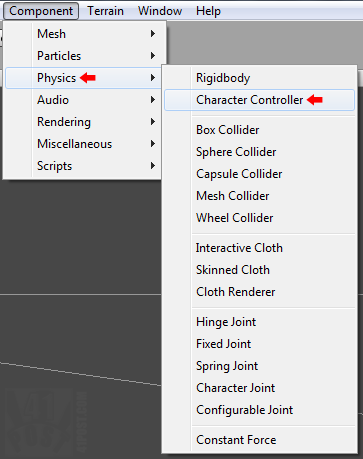
Next, select the Cube game object again, and at the Hierarchy tab, name it Player. Then, add a Character Controller component to it:

Attaching the Character Controller to the 'Player' game object.
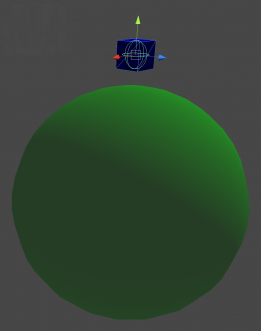
Some parameters of this components needs to be changed, such as the Skin Width and the Slope Limit. In this example, they are set to 0.5 and 180 respectively. Now, it’s necessary to place the Player game object on the top of the recently created sphere. Leave a space between the two; they must not be touching each other:

Positioning the Player above the Sphere.
The final step is to attach the following script to the Player game object:
using UnityEngine;
using System.Collections;

[RequireComponent (typeof (CharacterController))]

public class NormalWalker : MonoBehaviour
{
	//this game object's Transform
	private Transform goTransform;

	//the speed to move the game object
	private float speed = 6.0f;
	//the gravity
	private float gravity = 50.0f;

	//the direction to move the character
	private Vector3 moveDirection = Vector3.zero;
	//the attached character controller
	private CharacterController cController;

	//a ray to be cast
	private Ray ray;
	//A class that stores ray collision info
	private RaycastHit hit;

	//a class to store the previous normal value
	private Vector3 oldNormal;
	//the threshold, to discard some of the normal value variations
	public float threshold = 0.009f;

	// Use this for initialization
	void Start ()
	{
		//get this game object's Transform
		goTransform = this.GetComponent<Transform>();
		//get the attached CharacterController component
		cController = GetComponent<CharacterController>();
	}

	// Update is called once per frame
	void Update ()
	{
		//cast a ray from the current game object position downward, relative to the current game object orientation
		ray = new Ray(goTransform.position, -goTransform.up);

		//if the ray has hit something
		if(Physics.Raycast(ray.origin,ray.direction, out hit, 5))//cast the ray 5 units at the specified direction
		{
			//if the current goTransform.up.y value has passed the threshold test
			if(oldNormal.y >= goTransform.up.y + threshold || oldNormal.y <= goTransform.up.y - threshold)
			{
				//set the up vector to match the normal of the ray's collision
				goTransform.up = hit.normal;
			}
			//store the current hit.normal inside the oldNormal
			oldNormal =  hit.normal;
		}

		//move the game object based on keyboard input
		moveDirection = new Vector3(Input.GetAxis("Horizontal"), 0, Input.GetAxis("Vertical"));
		//apply the movement relative to the attached game object orientation
		moveDirection = goTransform.TransformDirection(moveDirection);
		//apply the speed to move the game object
		moveDirection *= speed;

		// Apply gravity down, relative to the containing game object orientation
		moveDirection.y -= gravity * Time.deltaTime * goTransform.up.y;

		// Move the game object
		cController.Move(moveDirection * Time.deltaTime);
	}
}
As for the script, it starts by declaring a Transform variable that will store a reference to the current game object's Transform component (line 9). The next ones are two floats: one for the speed which the player moves, and the other one for the gravity that 'glues' the player to the sphere (lines 12 and 14). The third one is a Vector3, that sets the direction in which the Player moves and a CharacterController object, that will be later used to get the attached Character Controller component (lines 17 and 19).
Then, we have the members that are going to be responsible for casting the ray and obtaining it's collision results, starting with a Ray object, that's simply a ray and a RayCastHit object which stores information about the ray collision (lines 22 and 24). Finally, there's a Vector3 named oldNormal, to store the normal.hit value from the previous frame and the float threshold, to filter which normal values should be applied to the Player game object (lines 27 and 29).
After that, the Start() method initializes both goTransform and cController variables (lines 32 through 38). Following the rest of the script, the Update() method is defined, and that's where it all happens.
Inside it, the ray object is initialized each frame, since the Player can change it's position any time one of the movement keys are pressed. The ray is being cast from the pivot of the attached game object contrary to it's up vector. This way, at the initial position, the ray is cast downwards, from the Player game object position – when the Player is upside down, the ray is cast upwards (line 44).
The next part of the Update() has a if statement that checks for a ray collision, using the ray origin and direction as parameters, as well as another parameter that defines the maximum distance that collisions should be checked. In this case, all collisions within the 5 unit range are stored at the hit object (line 47). Case an object has intersected the ray's path, line 50 is executed.
It's another if statement, that checks if the obtained normal at the collision point is smaller or greater than the threshold. Without it, the controllable object could get stuck at one of the hemispheres of the globe. Case true, the up vector of the attached game object is set to be the same as the surface's normal vector of the ray we just hit. This ensures that, when the Player is moved, it respects the Sphere surface (line 53).
Moving on, at line 60, the moveDirection variable is set to be the the same as the horizontal keyboard input, at the X and Z axis (respectively, horizontal and vertical inputs). Next, the movement is applied according to the attached game object's orientation (line 51). Finally, the speed of the game object is multiplied with the moveDirection variable applying the speed to the game object movement (line 62).
Another force must be applied to the game object: the gravity. This is done at line 67, by multiplying together the gravity value, the current deltaTime and the up vector of the game object. This makes it stay on the sphere, because, no matter what the attached game object orientation is, the gravity is always applied downwards relative to its orientation. Lastly, the Move() method from the cController is called, passing the calculated moveDirection multiplied by the deltaTime as a parameter (line 70).
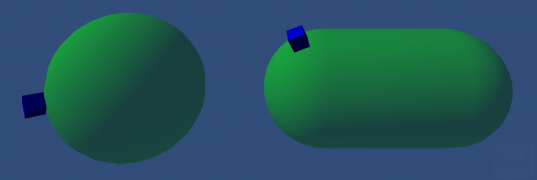
And that's it. Here's what it looks like:

A screenshot from the example project.
When executing the example project, you may notice some erratic movements as the player reaches one of the collider's hemispheres, even with the threshold. This happens due to the collider's geometry. Maybe the scene in this project would work better with a geosphere. An improvement that could be applied to this script is to dynamically calculate the threshold based on the difference between normal values.


Thank you I was looking for something similar since I played SMGalaxy ^_^
http://www.youtube.com/watch?v=qrIETZnhV34
Awesome tutorial! Is it possible to let the object rotate with AD keys? If i wanted to make wipeout-style game, where the vehicle hovers over different kind of geometry.
I got it almost working, but every time the cube hit the next normal the local y-axis snaps back to zero.
I don’t understand why the alignment of the local y-axis also influences the y-axis rotation?
Nice one! I second Alexander’s question: is there a way to make the object rotate on Y axis accordingly?
Can this be done with Freiendly/Enemy A.I and vehicles?