Unity: capturing audio from multiple microphones
Posted by Dimitri | Aug 5th, 2012 | Filed under Featured, Programming

As stated in the title, this Unity scripting tutorial explains how to select and record and playback audio from a list of connected microphones. It’s somewhat of a follow up of the previous post Unity: Capturing audio from a microphone. So, for those who are after a step by step explanation of how to capture audio from a single microphone in Unity, please read the previous post. The code featured in this tutorial has been developed and tested using Unity 3.5.4f1 at the editor and a as a standalone Windows application. A sample project with all the code discussed in this tutorial is available for download at the end of this tutorial.
Just as a reminder, to capture audio from a microphone in Unity, all that is necessary is to call the static Start() method from the Microphone class. It returns an AudioClip that can be played back using an AudioSource. However, this time, it’s now important to know how many microphones are connected to the computer and the recording capabilities of each microphone. This is going to be done by calling the static Microphone.GetDeviceCaps() method for each microphone and save the obtained information at two the integer arrays.
Not only that, but a SelectionGrid needs to be rendered, so the user can select the microphone that will capture the audio, here’s the code:
using UnityEngine;
using System.Collections;

[RequireComponent (typeof (AudioSource))]

public class MultipleMicrophoneInput : MonoBehaviour
{
	//A boolean that flags whether there's a connected microphone
	private bool micConnected = false;

	//The maximum and minimum available recording frequencies
	private int[] minFreqs;
	private int[] maxFreqs;

	//A handle to the attached AudioSource
	private AudioSource goAudioSource;

	//The current microphone
	private int currentMic = 0;

	//The selected microphone
	private int selectedMic = 0;

	//An integer that stores the number of connected microphones
	private	int numMics;

	//A boolean that flags whether the audio capture is active or not
	private bool recActive = false;

	//Use this for initialization
	void Start()
	{
		//An integer that stores the number of connected microphones
		numMics = Microphone.devices.Length;

		//Check if there is at least one microphone connected
		if(numMics <= 0)
		{
			//Throw a warning message at the console if there isn't
			Debug.LogWarning("No microphone connected!");
		}
		else //At least one microphone is present
		{
			//Set 'micConnected' to true
			micConnected = true;

			//Initialize the minFreqs and maxFreqs array to hold the same number of integers as there are microphones
			minFreqs = new int[numMics];
			maxFreqs = new int[numMics];

			//Get the recording capabilities of each microphone
			for(int i=0; i < numMics; i++)
			{
				Microphone.GetDeviceCaps(Microphone.devices[i], out minFreqs[i], out maxFreqs[i]);

				//According to the documentation, if both minimum and maximum frequencies are zero, the microphone supports any recording frequency...
				if(minFreqs[i] == 0 && maxFreqs[i] == 0)
				{
					//...meaning 44100 Hz can be used as the recording sampling rate for the current microphone
					maxFreqs[i] = 44100;
				}
			}

			//Get the attached AudioSource component
			goAudioSource = this.GetComponent<AudioSource>();
		}
	}

	void OnGUI()
	{
		//If there is at least as single microphone connected
		if(micConnected)
		{
			//For the current selected microphone, check if the audio is being captured
			recActive = Microphone.IsRecording(Microphone.devices[currentMic]);

			//If the audio from the current microphone isn't being recorded
			if(recActive == false)
			{
				//Case the 'Record' button gets pressed
				if(GUI.Button(new Rect(Screen.width/2-100, Screen.height/2-25, 200, 50), "Record"))
				{
					//Start recording and store the audio captured from the selected microphone at the AudioClip in the AudioSource
					goAudioSource.clip = Microphone.Start(Microphone.devices[currentMic], true, 20, maxFreqs[currentMic]);
				}
			}
			else //Recording is in progress
			{
				//Case the 'Stop and Play' button gets pressed
				if(GUI.Button(new Rect(Screen.width/2-100, Screen.height/2-25, 200, 50), "Stop and Play!"))
				{
					Microphone.End(Microphone.devices[currentMic]); //Stop the audio recording
					goAudioSource.Play(); //Playback the recorded audio
				}

				GUI.Label(new Rect(Screen.width/2-100, Screen.height/2+25, 200, 50), "Recording in progress...");
			}

			//Disable the mic SelectionGrid if a recording is in progress
			GUI.enabled = !recActive;

			//Render the SelectionGrid listing all the microphones and save the selected one at 'selectedMic'
			selectedMic = GUI.SelectionGrid(new Rect(Screen.width/2-210, Screen.height/2+50,420,50), currentMic, Microphone.devices, 1);

			//If the selected microphone isn't the current microphone
			if(selectedMic != currentMic)
			{
				//Assign the value of currentMic to selectedMic
				currentMic = selectedMic;
			}

		}
		else // No microphone
		{
			//Print a red "No microphone connected!" message at the center of the screen
			GUI.contentColor = Color.red;
			GUI.Label(new Rect(Screen.width/2-100, Screen.height/2-25, 200, 50), "No microphone connected!");
		}
	}
}
At the above script, eight member variables are being declared. The first one is a boolean that flags if there is at least one microphone connected (line 9). Then, there are two integer arrays, that will store the minimum and maximum frequencies supported by all connected microphones (lines 13 and 14). There’s no use capturing audio if it’s not going to be played back, so that’s why a AudioSource object is being declared at line 16.
The currentMic and selectedMic integers are, not surprisingly, the variables that store the selected and current microphone from the SelectionGrid (lines 19 and 22). The next integer being declared stores the number of connected microphones (line 25) and the last variable being declared, a boolean, will help detect if the audio capture is active or not (line 28).
The recording logic is being set up at the Start() method. There, the numMics member variable is initialized by storing the number of connected microphones (line 34). After that, an if statement checks whether numMics value is smaller than or equal to zero, in other words, if there are no microphones detected, a warning message is printed at the console (lines 37 through 41). However, if at least one microphone is present, the micConnected is set to true and the minFreqs and maxFreqs arrays are initialized to hold the same number of elements as there are connected microphones (lines 45 through 49).
At this point, the recording capabilities of each device can be obtained, which is achieved by the for loop that calls the Microphone.GetDeviceCaps() static method for each element of the static Microphone.devices string array saving the maximum and minimum available recording frequencies at the minFreqs and maxFreqs arrays. As explained on the previous post and on the comments at the above script, the official documentation states that if the minimum and maximum frequencies are both zero for a given microphone, it can record at any sample rate.
Therefore, to find out if that’s the case, still inside the for loop an if statement checks whether both minimum and maximum frequencies for a recording device are zero (lines 57 through 61). That being true, the maximum recording frequency for that device is set to 44100Hz (lines 52 through 62). Later, the elements at maxFreqs array are going to be used as one of the parameters to start the audio recording. And that’s it for this loop. The last thing the Start() method does is initialize the goAudioSource by obtaining a reference to the attached AudioSource on the same Game Object the script is linked to (line 65).
Now, the OnGUI() method is the one that will render the controls that will make it possible to the user to select the microphone and also start and stop the audio recording. It’s composed basically by a single if statement that checks for the value of the micConnected boolean (line 72). If it’s false, no microphones were detected, so a red error message is printed at the middle of the screen (lines 113 through 118). If it’s true, the Microphone.IsRecording() method is called, passing the name of the current microphone to it. By doing so, the current selected microphone state is obtained, returning true if there is an audio capture in progress and false otherwise. This value is stored at the recActive boolean (line 75).
Now, there’s one more if statement, and this one checks if the value of recActive is false (line 78), and if it is, the audio recording can be started when the user presses the ‘Record’ button, which will cause the Microphone.Start() method be called (line 84). The parameters passed to this method are the current microphone name string, a boolean that makes the recording loop over itself, the maximum time for the recording, which is being set at 20 seconds and the corresponding recording frequency that has been previously stored at the maxFreqs array (line 84). At this same line, the Microphone.Start() method return – an AudioClip – is being stored as the attached AudioSource‘s audio clip.
All that is left to do is to create a button that stops the recording and plays the recently obtained audio clip. This is being done at lines 90 through 94. The ‘Stop and Play’ button calls the Microphone.Stop() method, passing the current microphone name as a parameter, so the audio capture with the current mic is stopped. When the Play() method is called from the goAudioSource member object, the audio clip is played back.
Line 100 takes the inverse of the recActive boolean value to enable or disable the rendering of the selection grid. This means that, if an audio recording is in progress, the selection grid will be “grayed out” or unavailable to the user. This prevents accidentally changing to other microphone while the audio is being captured. Finally, the selection grid is rendered at line 103, and the integer corresponding to the pressed button from the grid is stored at selectedMic. And there’s a small if statement after that, which makes the value of the currentMic be the same as selectedMic, only if they are different (lines 106 through 110).
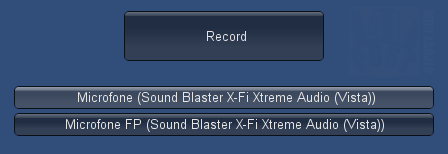
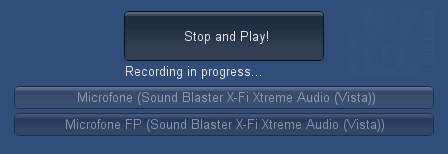
That’s it! Here’s a couple of screenshots of the sample project in action:

At the bottom, a selection grid displays all the connected devices that can be selected to capture audio.

Note that the selection grid is disabled when an audio recording is in progress.
Final Thoughts
Thankfully, Unity allows us to capture audio from the microphone in the free version. Not only that, but the Microphone class is actually pretty straightforward, listing all the devices under a static string array and and returning the captured audio as an AudioClip, which is great, because the audio can be either played back or stored into a file.
Again, this application has only been tested as an standalone application on a Windows PC and on the editor. It will probably work as a web player if the necessary permissions are set. I haven’t being able to test it on a mobile device to see if it works, but I would be surprised if it did.
Downloads
Be the first to leave a comment!


