Android: loading images from a remote sever, SD card and from the Resources folder
Posted by Dimitri | Jan 26th, 2011 | Filed under Programming
As stated on the title, this post will explain how to load a image from 3 different sources: the SD card, from a remote server and from the Resources folder. Since the methods and code used to load these images from these sources are different from one another, this post is going to be divided into three different parts, one for each location.
Select one of the following links to go to a specific part of the post:
- Loading an image from the Resources (‘res’) folder
- Loading an image from the SD card
- Loading an image from a remote location
Let’s start by explaining the easiest one: how to load a image from the Resources folder.
Loading an image from the Resources (‘res’) folder
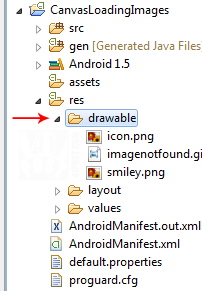
The Resources (or the ‘res’) folder is the most simple way to load an image onto the screen. To load an image from the Resources folder, it must be placed inside the drawable subfolder, like this:

Drag and drop the image here.
After the image has been placed into this folder, we use a dedicated Android class that was designed to handle images, called the Bitmap class. The next step is to create an object of that class, and tell the app where the image is being loaded from, in this case it will be the ‘res/drawable’ folder. For that, we need to create a handle to this folder and use a dedicated class that loads images, which is the BitmapFactory class. We will use its methods to open and copy the image information into the instantiated Bitmap object.
Here’s the Canvas class code:
public class CustomView extends View
{
	//create this object to have access to the application's resources
	private Resources res;

	//creates an empty bitmap
	private Bitmap resBMP;

	public CustomView(Context context)
	{
		super(context);

		//creates a context handler, to link the resource folder to the application context
		res = context.getResources();

		//loads the bitmap that is inside the res/drawable/folder
		resBMP = BitmapFactory.decodeResource(res, R.drawable.smiley);
	}

	//Override this method to render elements on the screen using the Canvas
	@Override
	protected void onDraw(Canvas canvas)
	{
		//render the resBMP bitmap positioned at 88px horizontally and 35px vertically.
		canvas.drawBitmap(resBMP, 88, 35, null);

		//the parent onDraw() method.
		super.onDraw(canvas);
	}
}
The Activity class will be omitted, because it is going to be pretty standard. As any common Activity, it will just set the CustomView as the current context.
Loading an image from the SD card:
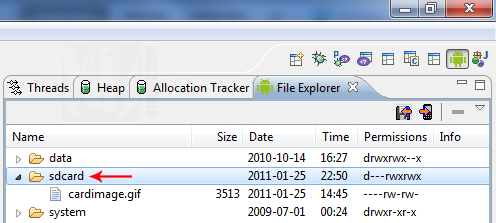
For this example, the image is going to be placed at the root of the SD card. If you are using the Eclipse IDE, it is possible to place the image inside an emulated device in a very simple manner: after the device is loaded and finishes its boot sequence, change to the DDMS perspective. Then, simply drag and drop the image file into the sdcard folder:

Drag and drop the image here.
The code will use practically the same logic as loading a image from the Resources folder explained above, except this time we are not going to need a handle to the application’s resources. Another difference is that we need to check if the file exists before trying to load it and point out the path to where the image file is located. Also, the method from the BitmapFactory class that will be used to decode the file into a Bitmap object is going to be different. So, it makes sense to place this code inside a method at the View class, like this:
public class CustomView extends View
{
	//creates an empty Bitmap that will be used to display the image from the SD card
	public Bitmap sdcardBMP;

	//as we inherit the View class, it is necessary to add this constructor
	public CustomView(Context context)
	{
		super(context);

        sdcardBMP = LoadBMPsdcard("/sdcard/cardimage.gif");
	}

	//this method loads the bitmap from the SD card
	private Bitmap LoadBMPsdcard(String path)
	{
		//creates a 'File' object, to check if the image exists (Thanks to Jbeerdev for the tip)
		File imageFile = new File(path);

		//if the file exists
		if(imageFile.exists())
		{
			//load the bitmap from the given path
			return BitmapFactory.decodeFile(path);
		}
		else
		{
			//return the standard 'Image not found' bitmap placed on the res folder
			return BitmapFactory.decodeResource(getResources(), R.drawable.imagenotfound);
		}
	}

	//Override this method to render elements on the screen using the Canvas
	@Override
	protected void onDraw(Canvas canvas)
	{
		//render the SD card image
		canvas.drawBitmap(sdcardBMP, 88, 275, null);

		//the parent onDraw() method.
		super.onDraw(canvas);
	}
}
Again, the Activity class will be omitted, because it is going to be pretty standard. As any common Activity, it will just set the CustomView as the current context.
Loading an image from a remote location
This is surely the most complex way to load an image into the Canvas. The code to do it is more complicated then the above examples, because it isn’t possible to simply load the image on the same thread that the application is being executed from. This is due to the fact that Android applications must respond in 5 seconds, otherwise, they will throw an exception and will be finished by the OS. Since we don’t know the time it will take to download a image, or even if it is available, we can’t simply place the remote image loading code on the application’s thread.
The solution for this problem is to call the method that will get the image from the server from another thread, which leads to the second problem: only the main application thread can update its Canvas. We can avoid this one by instantiating a object from the Handler class that was designed to allow the updating the Canvas from another thread.
There is one last problem to solve: the canvas can’t be recycled (or refreshed, if you prefer), at least not without having permission to control the Canvas’ surface holder. As this is way out of the scope of this post, and for the sake of the following example’s simplicity, the image will be downloaded from the server before the Canvas is drawn onto the screen.
Let’s not forget to add the following line to the Manifest file of the app, so it can access the Internet:
<uses-permission android:name="android.permission.INTERNET"></uses-permission>
Add this line right after the one that has the android:versionName on it.
The following code will execute the required steps to load a image from a remote location, which are:
- Instantiate a Bitmap object to store and display the image.
- Create a method to download the image from a remote location.
- Create and start a separated thread.
- Call the method that will download the image inside the recently created thread.
This way, the Activity class should look like this:
public class CanvasExample extends Activity implements Runnable
{
	//set the custom view
	private CustomView view;
	//the handler object is used to update the UI thread from another one
	private Handler handler = new Handler();
	//the bitmap to be downloaded
	public Bitmap downloadedBitmap;


    /** Called when the activity is first created. */
    @Override
    public void onCreate(Bundle savedInstanceState)
    {
        super.onCreate(savedInstanceState);

        //instantiate a view object
        view = new CustomView(this);

        //starts a new thread that will execute the code from the run() method
		new Thread(this).start();

		//set this view as the content of this Activity
        setContentView(view);
    }

    //This method is responsible for downloading the image from a remote location
	private Bitmap DownloadBMP(String url) throws IOException
	{
		//create a URL object using the passed string
		URL location = new URL(url);
		//create a InputStream object, to read data from a remote location
		InputStream is = location.openStream();
		//use the BitmapFactory to decode this downloaded stream into a bitmap
		Bitmap returnedBMP = BitmapFactory.decodeStream(is);
		//close the InputStream
		is.close();
		//returns the downloaded bitmap
		return returnedBMP;
	}

	//this method must be overridden, as we are implementing the runnable interface
	@Override
	public void run()
	{
		//update the canvas from this thread
		handler.post(new Runnable()
		{
			@Override
			public void run()
			{
				//try to download the image from a remote location
				try
				{
					downloadedBitmap = DownloadBMP("http://img41.imageshack.us/img41/426/bricks.gif");
				}
				//if the image couldn't be downloaded, return the standard 'Image not found' bitmap
				catch (IOException e)
				{
					downloadedBitmap = BitmapFactory.decodeResource(getResources(), R.drawable.imagenotfound);
				}
			}
		});
	}
}
This is how it works: the DownloadBMP() method downloads a image using string passed as a parameter. Both URL and InputStream classes throw an IO Exception, that is why there is the throws statement at the DownloadBMP method declaration.
The first run() method is the code that will run at the thread that was created and started on line 21. The handler object has its post method called so it is possible to update the Canvas from another thread. This method needs a Runnable object as a parameter, which in turn requires another run() method to be implemented.
At this inner run() method implementation, we have a try/catch block that is used to catch the IOException (if necessary) throw by the DownloadBMP() method. If the image exists and it has been downloaded, it is stored into the downloadedBitmap variable. Just in case the exception is thrown, the downloadedBitmap is set as the standard ‘image not found’ bitmap located inside the Resources folder.
That’s it for the Activity. As for the View, it is going to be the same as the above examples, except there is no need to instantiate a Bitmap variable – just call it directly from the Activity class, into the Canvas’ onDraw() method. like this:
//render the downloaded bitmap from the CanvasExample class
canvas.drawBitmap( ((CanvasExample)getContext()).downloadedBitmap, 88, 155, null);
Since the downloadedBitmap is a public member of the CanvasExample Activity it is possible to call it directly by getting its context. If the above line appears to be a little strange to you please read the post: Access Activity class from View. This post explains thoroughly how to access Activity public members from its View.
And that’s it. Here’s the source code that features an Activity with a Custom View that render images from all the 3 different locations:
UPDATE 1: To learn how to load an image from a remote location after the View has been created and rendered, check out this post: Android: Creating a button to load images from a remote server.
UPDATE 2: ImageShack changed URL for the image mentioned on this post. Now, it can accessed by either the two following URLs:
- http://imageshack.com/a/img291/426/bricks.gif or
- http://imageshack.com/a/img705/426/bricks.gif


Hi there, I am trying to display pictures that are stored on the sd card using a gridview. Any suggestions?
Find the Grid2 class at Android 2.1 SDK examples. Change the mThumbIds int array to an Uri array (line 82). Then, add the URI paths of your images from the SD card as the elements of the array, like this:
private Uri[] mThumbIds ={Uri.parse("/sdcard/yourimage.png"),Uri.parse("/sdcard/anotherimage.png")};Finally, change line 75 from:
imageView.setImageResource(mThumbIds[position]);to
imageView.setImageURI(mThumbIds[position]);If you don’t want to use URIs:
Again, find the Grid2 class at Android 2.1 SDK examples. This time, change the mThumbIds int array to a String array (line 82). Then, add the paths of your images from the SD card as the elements of the array, like this:
private String[] mThumbIds ={"/sdcard/yourimage.png","/sdcard/anotherimage.png"};Finally, change line 75 from:
imageView.setImageResource(mThumbIds[position]);to
imageView.setImageBitmap(BitmapFactory.decodeFile(mThumbIds[position]));Really very helpful example.and has been explained very well.
Thanks!
very nice tutorial. Little hard to understand, but I have to try it.
this is not working ??????
can we add something in XML also….